
Properly inflated bicycle tyres are crucial for a safe, smooth, and efficient ride. Under or over-inflated tyres can cause numerous problems, such as increased rolling resistance, poor handling, and reduced tyre lifespan. In this article, we will explain how to pump bicycle tyres correctly and provide some tips for maintaining optimal tyre pressure.
- Know Your Tyre Pressure
Before you start pumping your bicycle tyres, it is essential to know the recommended pressure range. This information is usually printed on the side of the tyre or specified in your bicycle’s user manual. Tyre pressure is measured in PSI (pounds per square inch) or bars. Keep in mind that different types of bicycles require different pressure ranges, so always follow the manufacturer’s recommendations.
Understanding and Maintaining Optimal Inflation
Understanding the importance of proper tyre pressure and maintaining it consistently can significantly impact your cycling experience. In this section, we will delve deeper into the recommended tyre pressure for different types of bicycles, the factors affecting tyre pressure, and the benefits of maintaining optimal inflation.
- Recommended Tyre Pressure for Different Bicycles
Different types of bicycles require different tyre pressure ranges. The following guidelines will help you determine the appropriate pressure for your bike:
- Road bikes: These bikes typically require higher pressure, ranging from 80 to 130 PSI. The exact pressure depends on the rider’s weight, tyre size, and personal preferences. Generally, heavier riders should use higher pressures, while lighter riders can use lower pressures.
- Mountain bikes: Mountain bike tyres need lower pressure than road bikes due to their wider profile and off-road use. The recommended range is usually between 25 and 50 PSI, depending on the rider’s weight, riding style, and trail conditions.
- Hybrid bikes: As these bikes are a combination of road and mountain bikes, their tyre pressure falls in between the two, typically ranging from 50 to 70 PSI.
- Gravel bikes: Gravel bike tyres have a wider range of pressure due to their versatile nature. Depending on the terrain and rider preference, pressures can range from 30 to 80 PSI.
Remember to check the sidewall of your tyre or your bike’s user manual for the manufacturer’s specific recommendations.
- Factors Affecting Tyre Pressure
Several factors can impact your bicycle tyre pressure:
- Temperature: Tyre pressure can fluctuate due to changes in temperature. As temperature decreases, so does tyre pressure. Conversely, as temperature increases, tyre pressure also increases. It’s essential to check and adjust your tyre pressure according to weather conditions.
- Altitude: Changes in altitude can affect tyre pressure as well. Higher altitudes can lead to lower pressures due to decreased air pressure.
- Rider’s weight and preferences: Heavier riders generally require higher tyre pressures to support their weight and avoid pinch flats. Personal preferences, such as desired ride comfort and handling, can also influence your choice of tyre pressure.
- Benefits of Optimal Tyre Pressure
Maintaining the recommended tyre pressure offers several advantages:
- Improved handling and stability: Properly inflated tyres provide better grip and cornering, allowing for more precise control and safer rides.
- Reduced rolling resistance: Optimal tyre pressure reduces rolling resistance, which means you’ll expend less energy to maintain your speed.
- Increased tyre lifespan: Over or under-inflated tyres can cause uneven wear, leading to a shorter lifespan. By maintaining the correct pressure, you can extend the life of your tyres.
- Lower risk of punctures: Correct tyre pressure helps prevent pinch flats and minimizes the risk of punctures due to road debris.
Knowing and maintaining the appropriate tyre pressure for your bicycle is critical for a safe and enjoyable cycling experience. Regularly check your tyre pressure, consider external factors, and make adjustments as needed to optimize your bike’s performance and your riding comfort.
Recommended Tyre Pressure for Different Types of Bicycles
| Bicycle Type | Tyre Size | Pressure Range (PSI) |
|---|---|---|
| Road Bike | 700x23c | 90-110 |
| 700x25c | 80-100 | |
| Mountain Bike | 26×2.0″ | 25-35 |
| 27.5×2.3″ | 22-32 | |
| Hybrid Bike | 700x35c | 50-70 |
| 700x40c | 40-60 | |
| Gravel Bike | 700x38c | 35-55 |
| 650bx47c | 30-50 |
Choose the Right Pump: Selecting the Ideal Bicycle Pump for Your Needs
When it comes to inflating your bicycle tyres, choosing the right pump is essential. With various options available, it can be challenging to determine which type best suits your needs. In this section, we’ll discuss the most common types of bicycle pumps and their key features, helping you make an informed decision.
- Floor Pumps
Floor pumps, also known as track pumps or stand pumps, are the most popular option for home use. They provide a high volume of air, allowing you to inflate your tyres quickly and efficiently. Key features of floor pumps include:
- Stable base: A floor pump’s broad base allows for secure footing and easy pumping.
- Long hose: The extended hose makes it simple to reach the valve without straining.
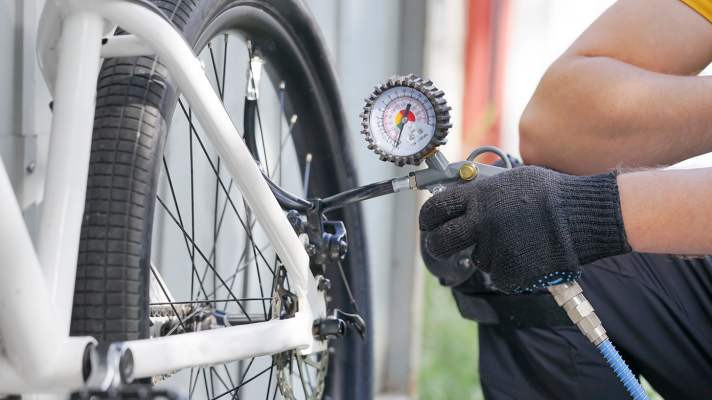
- Built-in pressure gauge: Many floor pumps feature a built-in pressure gauge, enabling you to monitor the tyre pressure accurately while inflating.
- Dual-head compatibility: Many floor pumps come with a dual-head design that accommodates both Schrader and Presta valves, eliminating the need for an adapter.

- Mini Pumps
Mini pumps are portable, lightweight pumps designed for on-the-go use. They can easily be mounted on your bicycle frame or carried in a saddlebag or backpack. While they may require more effort to inflate a tyre compared to a floor pump, they are invaluable in case of a flat tyre during a ride. Key features of mini pumps include:
- Portability: Their compact design makes mini pumps the ideal choice for cyclists who need a pump on the go.
- Frame mount: Most mini pumps come with a mounting bracket that allows you to attach the pump to your bike’s frame.
- Compatibility: Like floor pumps, many mini pumps are compatible with both Schrader and Presta valves.
- High pressure or high volume options: Some mini pumps are designed for high pressure (ideal for road bikes) or high volume (ideal for mountain bikes) to cater to specific cycling needs.
- CO2 Inflators
CO2 inflators are small, lightweight devices that use compressed CO2 cartridges to inflate tyres almost instantly. They are the fastest and most convenient option for inflating tyres, particularly during a race or group ride. However, they are single-use and can be less cost-effective and environmentally friendly in the long run. Key features of CO2 inflators include:
- Speed: CO2 inflators provide rapid inflation, making them perfect for time-sensitive situations.
- Compact design: Their small size and lightweight construction make CO2 inflators easy to carry during rides.
- Compatibility: Many CO2 inflators work with both Schrader and Presta valves, either directly or with an adapter.
- Control: Some CO2 inflators have a control valve or trigger that allows you to regulate the CO2 flow for precise inflation.
When choosing a bicycle pump, consider your primary use and personal preferences. A floor pump is the best choice for home use due to its stability, efficiency, and built-in pressure gauge. A mini pump is essential for on-the-go repairs, while a CO2 inflator offers rapid inflation in time-sensitive situations. By selecting the right pump, you can ensure your bicycle tyres are always properly inflated, providing a safe and enjoyable cycling experience.
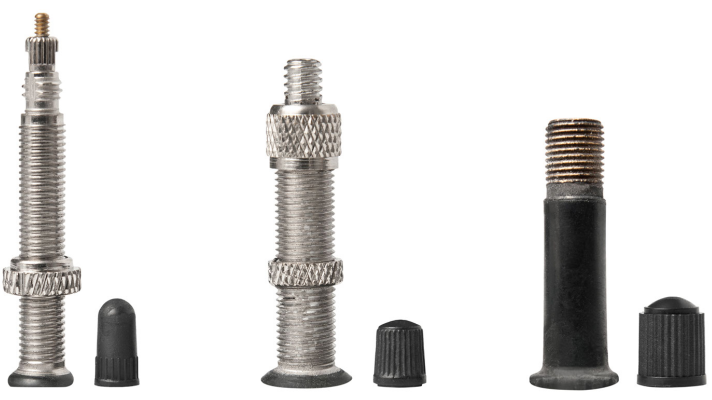
Identify the Valve Type: Understanding Schrader, Presta, and Dunlop Valves

Bicycle tyres are equipped with one of three common valve types: Schrader, Presta, or Dunlop (also known as Woods). Identifying the valve type on your bike is crucial for selecting a compatible pump or adapter. In this section, we’ll discuss the differences between these valve types and provide tips on how to identify them.
- Schrader Valve
Schrader valves are the most common type of valve found on bicycles, particularly on mountain bikes, hybrid bikes, and kids’ bikes. They are also used on car tyres. Key features of Schrader valves include:
- Wider and shorter than Presta valves
- A central pin that needs to be depressed to release air or add pressure
- A threaded exterior with a valve cap to protect against dust and dirt
- Easy to use with most air pumps, including those at gas stations
- Presta Valve
Presta valves are commonly found on road bikes and high-performance bikes. They are designed to hold higher pressures and have a slimmer profile. Key features of Presta valves include:
- Narrower and longer than Schrader valves
- A small nut at the top that needs to be unscrewed before inflating or deflating
- A non-threaded valve stem with a small lock nut to secure the valve to the rim
- Often require a specific pump head or an adapter to use with standard air pumps
- Dunlop Valve
Dunlop valves, also known as Woods valves, are less common and primarily found on older bicycles or bikes in some European and Asian countries. Key features of Dunlop valves include:
- A diameter similar to a Schrader valve but with a narrower top section, resembling a combination of Schrader and Presta valves
- A rubber tube inside the valve that seals it when not in use
- Can be inflated using either Schrader or Presta pump heads, although they may require a specific adapter in some cases

To identify your bike’s valve type, examine the valve stem, and look for the characteristics mentioned above. Once you’ve identified your valve type, choose a pump that is compatible with your specific valve or use an adapter if necessary. Knowing your valve type will ensure you can inflate your bicycle tyres correctly and maintain optimal tyre pressure for a smooth and safe ride.
Pumping the Tyre: A Step-by-Step Guide to Inflating Bicycle Tyres
Inflating your bicycle tyres to the correct pressure is crucial for a smooth, safe, and efficient ride. In this step-by-step guide, we’ll walk you through the process of pumping your bicycle tyres, regardless of the valve type.
Step 1: Prepare the valve
- For Schrader valves: Remove the valve cap.
- For Presta valves: Remove the valve cap, then unscrew the small nut at the top of the valve. Tap the valve gently to release a tiny amount of air, ensuring the valve is not stuck.
- For Dunlop valves: Remove the valve cap. If the valve features a locking ring, loosen it to prepare for inflation.
Step 2: Attach the pump head
- For Schrader valves: Press the pump head onto the valve and ensure it’s seated securely. If the pump head has a lever, flip it to lock the head onto the valve.
- For Presta valves: Press the pump head onto the valve and pull up the pump’s lever to lock it in place.
- For Dunlop valves: Press the pump head onto the valve, ensuring it’s seated securely. If necessary, use a specific adapter or pump head designed for Dunlop valves.
Step 3: Begin pumping
- For floor pumps: Place one foot on the pump’s base for stability, then use both hands to hold the handle and your body weight to press down on the pump handle, generating a smooth and steady pumping motion.
- For mini pumps: Hold the pump body securely with one hand, while using the other hand to create a steady pumping motion. Mini pumps may require more effort and time to inflate a tyre compared to a floor pump.
Step 4: Monitor the pressure
- If your pump has a built-in pressure gauge, keep an eye on it as you inflate the tyre. Stop pumping when the pressure reaches the recommended range for your tyre (check the sidewall or your bike’s user manual for guidance).
- If your pump doesn’t have a built-in gauge, periodically check the tyre pressure using a separate tyre pressure gauge. Stop pumping when the pressure is within the recommended range.
Step 5: Remove the pump head and secure the valve
- For Schrader valves: Unlock the pump head by flipping the lever (if applicable) and remove the pump head from the valve. Replace the valve cap.
- For Presta valves: Unlock the pump head by pushing the lever down and remove the pump head from the valve. Tighten the small nut at the top of the valve and replace the valve cap.
- For Dunlop valves: Remove the pump head from the valve. If there is a locking ring, tighten it to secure the valve. Replace the valve cap.
By following these steps, you can ensure that your bicycle tyres are properly inflated, improving your bike’s performance and enhancing your overall riding experience. Remember to check and adjust your tyre pressure regularly, as tyres can lose air over time and pressure can be affected by factors such as temperature and altitude.
Tips for Maintaining Optimal Tyre Pressure: A Light-Hearted Guide to a Breezy Bike Ride
In the realm of cycling, keeping your bicycle tyres at their optimal pressure is the secret to unlocking a ride as smooth as a hot knife through butter. So, to put a little pep in your pedaling, we’ve compiled some whimsical tips to help you keep those tyres in tip-top shape!
- Becoming a Pressure Detective
Tyres are sneaky creatures; they’ll lose air when you least expect it. Stay one step ahead by regularly donning your detective hat and checking their pressure. Keep a keen eye on your tyres at least once a week, or before embarking on any epic cycling adventures!
- The Power of the Pump
A pump is a cyclist’s best friend. Choose wisely, and you’ll have a trusty companion for life. Remember, floor pumps are the superheroes for home use, mini pumps are your portable sidekicks, and CO2 inflators swoop in for rapid inflation when time is of the essence.

- A Thermometer’s Tale
Temperature can play tricks on your tyre pressure. As the mercury rises, so does the pressure in your tyres, while colder days can leave them feeling a little deflated. Don’t fall for this mischief—adjust your tyre pressure to suit the weather’s whims.
- Highs and Lows of Altitude
As you soar to new heights on your cycling expeditions, remember that higher altitudes can lower your tyre pressure. If you’re planning to conquer a mountain, be prepared to give your tyres a little extra TLC.
- The Personal Touch
Your tyres, like you, are unique. Your weight and preferences influence the ideal pressure for your tyres. Heavier riders may require higher pressures, while lighter riders can take it easy with a bit less. Experiment and discover the perfect balance for a ride that’s as comfy as your favorite pair of socks.
- Keep a Watchful Eye
A pressure gauge is like the all-seeing eye, keeping you informed and in control. Use it to monitor your tyre pressure and make adjustments as needed. If your pump doesn’t have a built-in gauge, invest in a separate one to ensure your tyres are always on point.
By following these playful tips, you’ll ensure your bicycle tyres are perfectly inflated, resulting in a ride that’s equal parts enjoyable, safe, and efficient. Remember, tyre pressure is the key to unlocking the magical world of smooth cycling!
4BiKE Cycling Marketplace is an international e-commerce platform dedicated to the cycling industry. Founded in 2014, the company operates online marketplaces in the United Kingdom (4bike.co.uk) and the United States (4bike.us), as well as a business-to-business platform (4bikebusiness.com) that caters to the global cycling community. 4BiKE focuses on providing vendors with comprehensive support and services, including subscription-based plans, high SEO standards, marketing support, and streamlined sales processes.


